1 Bash命令行
- Bash是GNU的重要组件,是绝大部分Linux发行版本上默认的Shell
- 命令提示符:
[当前登录主机的用户名@当前登录主机的主机名 用户当前所处的目录]当前登录用户类型
~:当前用户的“家目录”
$:普通用户
#:根用户
例:[user1@localhost ~]$ - 长选项
命令 --help:输出命令的简短帮助文档 echo 字符串:回显字符串echo -n 字符串:回显字符串后不换行echo -e 字符串:输出\开头的转义字符。例:echo -e "Hello Linux\n\n"
nano文本编辑工具Ctrl+O:保存Ctrl+G:查看nano的帮助文档Ctrl+X:退出
- 连按两次
TAB键:列出所有以该字符串开头的命令 man:打开命令的帮助文档
在帮助文档中可以用\字符串从光标处开始向下查找,用n跳转到下一个匹配项,用N跳转到上一个匹配项。
q:退出man帮助文档su root:普通用户切换到根用户- 关机和重启
shutdown -h 数字:在指定数字分钟后关机
shutdown -h 数字:数字:在指定时间关机
shutdown -h now:立即关机
选项-r:重启
Ctrl+C:取消命令
shutdown -c:取消关机命令
注:shutdown关机命令后可跟字符串,用于向所有登录主机的用户解释说明关机的具体原因和具体安排。
2 目录、文件和权限
2.1 根目录
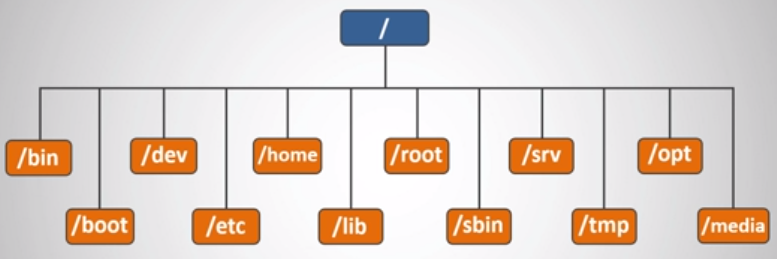
根据 FHS,根目录下至少应该包括如下 12 个目录,分别放置着不同用处的文件:
/bin:放置可执行的命令文件/boot:放置系统核心文件和开机所需文件/dev:放置系统设备相关文件/etc:放置系统主要配置文件/home:放置除根用户外其他用户的家目录。默认情况下,每个用户/home目录下有一个自己的私人目录/lib:放置系统和程序运行所要调用的库函数文件/root:root用户的家目录/sbin:放置根用户才能执行的命令文件/srv:放置服务启动之后需要访问的数据。如web服务所需要的网页数据就存放在/srv/www/目录下/tmp:程序临时存放文件的目录,任何人都可以访问。重要数据不可放置在此目录下/opt:第三方软件建议安装目录。非本发行版本所提供的软件建议放置在此目录下/media:放置移动设备相关文件。如光驱、U盘相关数据
2.2 命令
pwd:查询用户当前完整的工作目录mkdir(Make Directory):创建目录
mkdir -p:创建嵌套目录rmdir(Remove Directory):删除空目录ls(List):列出文件
ls -a:列出包括隐藏文件(以“.”开头的文件)在内的所有文件
ls -l:以长格式列出文件(列出文件的详细信息)
2.3 文件的用户和权限
例:
1 | [dev01@localhost~]$ ls -l |
| 字段 | 举例 | 含义 |
|---|---|---|
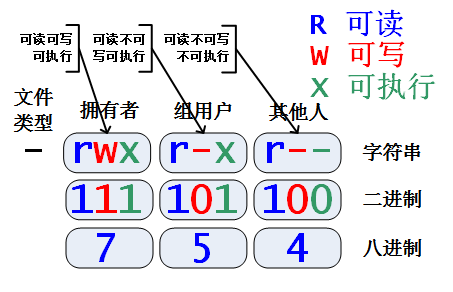
| 字段1 | -rwxr-xr–. | 类型和权限 |
| 字段2 | 1 | 连接数 |
| 字段3 | dev01 | 拥有者 |
| 字段4 | dgroup | 文件组 |
| 字段5 | 116 | 大小 |
| 字段6 | 9月27 12:42 | 被修改时间 |
| 字段7 | helloworld.sh | 文件名 |
| 字段1的第1个字符 | 类型 |
|---|---|
| d | 目录文件 |
| -或者f | 普通文件 |
| c | 字符设备文件 |
| b | 块设备文件 |
| l | 符号链接文件 |
 |
chmod:修改文件权限。例:1
2
3
4
5[nboocer@localhost tmp]$ ls -l ./hello.sh
-rwxr-xr--. 1 nboocer nboocer 32 7月 27 22:59 ./hello.sh
[nboocer@localhost tmp]$ chmod 700 hello.sh
[nboocer@localhost tmp]$ ls -l ./hello.sh
-rwx------. 1 nboocer nboocer 32 7月 27 22:59 ./hello.shchown:修改文件的拥有者和从属用户组(可省略冒号前面(拥有者)或后面(从属用户组))。例:1
2
3
4
5[nboocer@localhost tmp]$ ls -l ./hello.sh
-rwx------. 1 nboocer nboocer 32 7月 27 22:59 ./hello.sh
[nboocer@localhost tmp]$ chown nbcc:stu hello.sh
[nboocer@localhost tmp]$ ls -l ./hello.sh
-rwx------. 1 nbcc stu 32 7月 27 22:59 ./hello.sh
3 文件操作
3.1 拷贝文件 cp(copy)
cp [要拷贝的文件|文件目录] [目的文件名|目的目录]
其中第二个参数可以是一个目录,也可以是一个带路径的文件名,表示在拷贝的同时将这个文件重新命名。例:
1 | [root@localhost ~]# cp /tmp/file01 ~ |
cp命令也可以拷贝多个文件,只要在第一个参数的位置填入多个文件名,用空格隔开即可。例:
1 | [root@localhost ~]# cp /tmp/file02 /tmp/file03 /tmp/file04 ~ |
cp命令也可以拷贝整个目录,这需要在命令后跟-r选项。例:
1 | [root@localhost ~]# cp /tmp/dir01 ~ |
注意:
- 在拷贝文件的过程中,如果在目标目录中已有同名文件存在,
cp命令会默认先询问用户是否覆盖,用户同意后,cp命令才会覆盖这些文件。
若有批量的同名文件存在,建议在cp命令后跟**-f选项,并在cp命令前键入一个反斜杠\,那么cp命令就会强制覆盖所有**同名文件。例:1
2
3[root@localhost ~]# cp /tmp/file01 ~
cp: 是否覆盖*/root/file01*? y
[root@localhost ~]# \cp -f /tmp/file02 /tmp/file03 ~ - 在拷贝文件的过程中,文件的属性(包括文件拥有者、文件从属组、访问权限位)都有可能发生变化。例:如果需要将文件原原本本的拷贝,需要在
1
2
3
4
5[root@localhost ~]# ls -l /tmp/sample.sh
-rwxr-xr--. 1 nbcc nbcc 12 8月 26 17:34 /tmp/sample.sh
[root@localhost ~]# cp /tmp/sample.sh ~nbcc
[root@localhost ~]# ls -l ~nbcc/sample.sh
-rwxr-xr--. 1 root root 12 8月 26 18:16 /home/nbcc/sample.shcp命令后跟**-p选项(当然,使用cp -p的前提是登录用户对这个文件有写权限**)。例:1
2
3
4[root@localhost ~]# cp -p /tmp/sample.sh ~nbcc
cp: 是否覆盖*/home/nbcc/sample.sh*? y
[root@localhost ~]# ls -l ~nbcc/sample.sh
-rwxr-xr--. 1 nbcc nbcc 12 8月 26 17:34 /home/nbcc/sample.sh
3.2 移动文件 mv(move)
mv命令与cp命令的用法十分相似。mv [要移动的文件|文件列表|目录] [目的文件名|目的目录]mv命令既可以移动一个文件,也可以移动多个文件,或者移动整个目录。例:
移动单个文件:
1 | [root@localhost ~]# ls |
移动多个文件:
1 | [root@localhost ~]# mv /tmp/file06 /tmp/file07 /tmp/file08 ~ |
移动整个目录(与cp命令不同,mv命令移动目录时不需要加任何选项):
1 | [root@localhost ~]# mv /tmp/dir02 ~ |
注意:
- 与
cp命令相同,在用mv命令移动文件的过程中,如果在目标目录中已有同名文件存在,mv命令会默认先询问用户是否覆盖,用户同意后,mv命令才会覆盖这些文件。
若有批量的同名文件存在,建议在mv命令后跟**-f选项,那么mv命令就会强制覆盖所有**同名文件。 - Linux中并没有专门的重命名文件的命令,
mv命令可以实现这个功能。即将文件从原本目录移动到原本目录,路径不变,只改变文件名。例:1
[root@localhost ~]# mv ./file08 ./file08_rename
3.3 删除文件 rm(remove)
rm [要删除的文件|文件列表|目录]
删除目录要跟**-R**选项。例:
1 | [root@localhost ~]# rm -R ./dir01 |
在删除文件时,默认情况下,rm命令会先询问用户是否确定删除。如果批量删除文件,需要在rm命令后跟**-f**,让rm命令不询问而直接删除文件。例:
1 | [root@localhost ~]# rm -fR ./dir02/ |
3.4 创建文件 touch
touch [要创建的文件]
注意:如果创建的文件已经存在,touch命令将会改变这个文件的时间戳属性,也即文件的最后修改属性
4 链接文件
4.1 符号链接 ln(link)
ln -s [链接指向的文件] [链接名]-s选项表示符号链接(symbolic)
例:
1 | [nboocer@localhost ~]# ls -l /tmp/hello.sh |
我们可以通过符号链接文件读、写和执行源文件。如果源文件被删除,符号链接文件就会失效。
4.2 硬链接
在Linux中,当硬盘分区并格式化的时候,整个分区会被分为两个部分,即INode区和Data Block区。
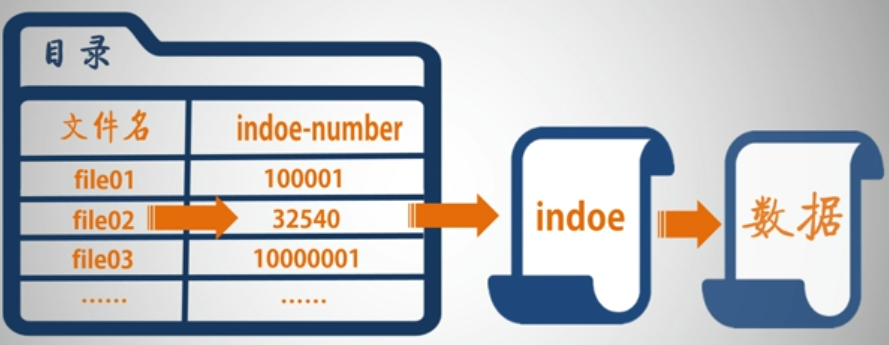
Linux中每个文件都被分为两部分存放,一部分是inode-number以及属性信息,放在INode区的一个iNode中,inode-number和iNode是一一对应的;另一部分是文件的实际数据,放在Data Block区中。
在Linux中,我们需要通过文件的iNode来找到存放文件数据的Data Block。
在一个硬盘分区中,不可能有两个文件共用一个iNode,当然也不可能有两个文件的inode-number是一样的。
如果将一个硬盘分区中的所有文件比作一本书,INode区就是其目录,Data Block区就是其内容。我们必须通过其目录才能找到具体的内容。
可以通过ls -il来查看文件的inode-number(列表的第一个字段)
4.2.1 Linux 目录
Linux的目录文件是一张表,包括文件名和inode-number两项,Linux存取文件的过程就是通过文件名找到对应的inode-number然后找到文件的iNode最后找到文件的数据。
4.2.2 硬链接
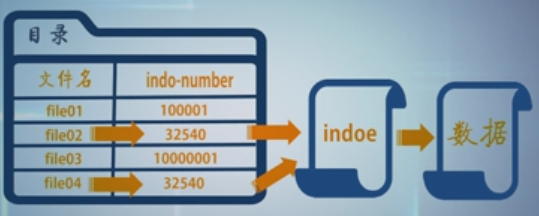
硬链接就是在目录这张表中,让一个inode-number对应多个文件名,文件iNode和数据还是一份,只不过文件多了一个名字,这个名字就被称为硬链接
4.2.3 命令
创建硬链接同样使用ln命令,但是不加-s选项:ln [链接指向的文件] [链接名]
例:
1 | [nboocer@localhost ~]# ls -il /tmp/sample.txt |
文件属性的第二个字段表示了硬链接数目的变化
本质上,“./sample_hl01”和“/tmp/sample.txt”是同一个文件,只不过是同一个文件的多个名字罢了(inode-number一样)
我们可以通过任意一个硬链接文件来读、写、执行源文件
如果将源文件删除,在本质上只是删除了一个文件名,我们仍然可以通过余下的文件名来对文件进行操作,当所有文件名都被删除,这个文件才算真正的被删除
注意:
- 强烈不建议为目录创建硬链接,容易造成目录遍历死循环[^1]
- 不能跨硬盘分区创建硬链接。因为在不同的硬盘分区中,文件的inode-number不再是唯一的[^2]
5 打包和解包文件 tar(tape archive)
5.1 打包
tar命令:将多个文件连接在一起,形成一个大文件,并不对文件进行压缩tar -cf [打包文件名] [要打包的文件|列表|目录]-c:创建打包文件-f:指定打包文件名
**tar -tf [文件名]**:查看打包文件中所有的文件名。例:
1 | [root@localhost ~]# tar -tf ./samplefile.tar |
用delete长选项删除打包文件中的某个特定文件tar -f [文件名] --dalete [要删除的文件名]
1 | [root@localhost ~]# tar -f ./samplefile.tar --delete tmp/file05 |
用**-A**选项合并两个打包文件tar -f [文件名1] -A [文件名2]
1 | [root@localhost ~]# tar -f ./sampledir01.tar -A ./samplefile.tar |
用**-r**选项向打包文件中添加新文件tar -f [打包文件名] -r [新文件名]
1 | [root@localhost ~]# tar -f ./sampledir01.tar -r ~/fileA.txt |
5.2 解包
用**tar -xf解包,默认解包目录是当前目录,可以用-C**选项指定要解包的目录tar -xf [解包文件名] -C [解包到目录]
1 | [root@localhost ~]# tar -xf ./sampledir01.tar -C ./sampledir |
6 压缩和解压文件 gzip
6.1 压缩文件
gzip 要压缩的文件|列表
注:gzip能提供高效的压缩,但不提供打包功能,只能压缩单个文件,因此gzip命令往往与tar命令一起使用
1 | [root@localhost ~]# ls -l |
可以看出压缩文件“sampledir01.tar.gz”比压缩前文件“sampledir01.tar”小
压缩后的文件将替换源文件,gzip自动为压缩文件添加“.gz”后缀
压缩比:通过一个数字选项设定,“1”表示最小压缩比(压缩速度最快),“9”表示最大压缩比(压缩速度最慢),默认压缩比为6。例:
1 | [root@localhost ~]# gzip -9 ./sampledir01.tar |
6.2 解压文件
gzip -d 要解压的文件
1 | [root@localhost ~]# gzip -d ./sampledir01.tar.gz |
6.3 打包压缩和解压缩解包
使用tar命令中的-z选项
打包压缩:**tar -czf 压缩文件名 要压缩的文件|列表**
例:
1 | [root@localhost ~]# tar -czf sample.tar.gz /tmp/samplefile01 /tmp/samplefile02 /tmp/samplefile03 |
解压缩解包:**tar -xzf 要解压的文件**
例:
1 | [root@localhost ~]# tar -xzf sample.tar.gz |
7 查找文件
locate命令:查找较快,功能较弱(因为Linux将系统中所有的文件名都记录在一个名为“/var/lib/mlocate/”的数据库中,用locate命令查找文件时,会在此数据库中查找,而不是真的通过遍历硬盘来查找)find命令:查找稍慢,功能强大
7.1 locate 命令
locate [查找的路径] [文件名的关键字]
例:在系统中查找名字中有“.tar”的文件
1 | [root@localhost ~]# locate .tar |
注意:用locate命令查找文件时,有时会找到已经被删除的数据,有时刚刚建立的文件无法查找到,这是记录文件名的数据库“/var/lib/mlocate/”默认情况下每天更新一次,不实时更新造成的。
可以通过updatedb命令手动更新数据,如果系统中储存文件较多,此操作将会花费一定时间。
7.2 find 命令
find [查找范围] [查找条件] [动作]
查找范围可省略,表示在当前工作目录中查找
7.2.1 根据文件名查找
使用**-name**选项
例:在整个系统中查找文件名为“passwd”的文件
1 | [root@localhost ~]# find / -name passwd |
注意:文件名需要时精确的名称,而不是关键字。如果需要用关键字进行查找,则要用通配符
7.2.2 根据文件类型查找
使用**-type**选项,后面跟代表文件类型的一个字符。其中文件类型字符在本章2.3小节中讲到。
例:在/bin目录下查找所有链接文件
1 | [root@localhost ~]# find /bin -type l |
7.2.3 根据文件的时间属性查找
| 选项 | 时间单位 | 含义 |
|---|---|---|
| -mtime | 天 | 和文件内容修改时间相关 |
| -mmin | 分钟 | 和文件内容修改时间相关 |
| -atime | 天 | 和文件被读取/执行时间相关 |
| -amin | 分钟 | 和文件被读取/执行时间相关 |
| -ctime | 天 | 和文件属性修改时间相关 |
| -cmin | 分钟 | 和文件属性修改时间相关 |
例:
1 | 在/tmp目录下查找在 3天之内 内容曾经发生过变化的文件 |
7.2.4 根据文件大小查找
使用**-size**选项
| 时间单位 | 含义 |
|---|---|
| c | 字节 |
| k | 1024字节 |
| M | 1024k |
| G | 1024M |
例:
1 | 在/tmp目录下查找大小 小于3k字节 的文件 |
7.2.5 根据文件拥有者和从属用户组属性查找
| 时间单位 | 含义 |
|---|---|
| -user | 拥有者名称 |
| -uid | 拥有者的uid |
| -group | 从属用户组名称 |
| -gid | 从属用户组名称的gid |
例:
1 | 在/tmp目录下查找 拥有者是root用户 的文件 |
7.2.6 根据文件权限查找
使用**-perm**选项,后面跟一个八进制的文件访问权限条件数字。其中文件访问权限条件数字在本章2.3小节中讲到。
例:在/tmp目录下查找权限为“rwx r-x r–”的文件
1 | [root@localhost ~]# find /tmp -perm 754 -ls |
7.2.7 联合条件
find命令可使用联合条件
| 选项 | 含义 |
|---|---|
| -a | 与 |
| -o | 或 |
| ! | 非 |
在使用时要讲条件用小括号括起来,其中左右小括号要使用**\进行转义**;左右小括号和条件之间各有一个空格
例:在/tmp目录下查找权限为“rwx r-x r–”的文件
1 | [root@localhost ~]# find /tmp \( -size +1k -a -size -10M -a mmin -30 -a type f \) -ls |
7.2.8 动作命令选项
-exec shell命令find将对查找到的文件执行该参数所指定的 shell 命令
例 1:在/tmp目录下查找大小大于1k小于10M的普通文件,并且将它们都删除
1 | [root@localhost ~]# find /tmp \( -size +1k -a -size -10M -a mmin -30 -a type f \) -exec rm -rf {} \; |
其中,rm -rf是具体命令,{}代表查找到的文件,;表示动作介绍(由于;在 bash 环境下有特殊意义,所以需要用\转义)。注意,在{}和\;之间有一个空格
例 2:在当前家目录下查找在10分钟之内被创建或被修改过的目录文件,并且将它们打包成与目录同名后缀为“.tar”的打包文件
1 | [root@localhost ~]# find ~ \( -mmin -10 -a -type d \) -exec tar -cf {}.tar {} \; |
-ok:用法与-exec基本相同,只不过以一种更安全的模式来执行动作命令,在执行每一个命令之前都会给出提示,让用户确定是否执行,在删除文件时可以考虑使用-ok选项
8 通配符[^3]
| 符号 | 含义 |
|---|---|
| * | 任意长度(包括0长度)字符 |
| ? | 任意单个字符 |
| [c1-c2] | 匹配 c1-c2 字符序列中的任意单一字符(前提是 c1-c2 是一个有序的字符序列) |
| [c1,c2,…,cn] | 匹配中括号之间字符列表中的任意单一字符 |
| {string1,string2,…,stringN} | 匹配 string1,string2 直至 stringN 中的某个字符串 |
| ! | 取反(往往与[]或者{}连用) |
例:*.txt:名字以“.txt”结尾的所有文件
1 | 列出/bin目录下所有名字长度为4个字符,并以“sh”结尾的文件 |
注意:如果在find命令的-name选项中使用通配符,后面的参数必须放在双引号""中
9 查看文本文件
9.1 cat 命令(concatenate)
cat命令功能:
- 连接几个文件
- 从键盘创建文件
- 查看文件
其中查看文件功能:**cat 文件名**
注意:cat命令查看文件时一次将全部内容输出到命令行,如果文件较长,前面的内容就看不到了,cat命令不提供翻页功能,所以只适合查看较小的文件
例:查看系统下的文件“/etc/passwd”
1 | [root@localhost ~]# cat /etc/passwd |
9.2 less 命令
less命令适合查看较大文件:**less 文件名**
进入文件内容后,用↑、↓、PgUp、PgDn进行操作;利用/关键字进行查找,利用n跳转到下一个匹配项,利用N跳转到上一个匹配项;用q退出查看
例:
1 | [root@localhost ~]# less /var/log/messages |
9.3 head 与 tail 命令
head命令用于查看文件的头几行head -n 参数 文件名
如果省略-n 参数,默认显示前10行
例:查看messages log文件的前20行
1 | [root@localhost ~]# head -n 20 /var/log/messages |
tail命令:用于查看文件的末尾几行,用法与head命令相同
head和tail命令通常用来查看日志文件更新的内容
[^1]: 参见 http://wiki.c2.com/?HardLink
[^2]: 参见 http://www.ibm.com/developerworks/cn/linux/l-cn-hardandsymb-links/#listing5
[^3]: 更多用法参见 http://www.ibm.com/developerworks/cn/linux/l-lpic1-v3-103-3/


